Using natural stone tiles for your bathroom, kitchen or floor will definitely change the overall perception of your house. It is always recommended to hire a professional tiler to lay your natural stone, however it is not that difficult to do it yourself if you have a hand for it and we will give you some simple steps to follow if redecorating your bathroom or replacing your flooring. Prior to the actual laying, however, we suggest that you follow some general guidelines on working with natural stone.
Since marble, granite, limestone, travertine and slate are natural products you can expect variation in their shades and overall colour from batch to batch. Therefore, we strongly recommend to offer a slightly bigger number than the estimate, so that all tiles will come from one batch – 10% more tiles than the envisaged is a good stock. Once your order arrives make sure that you got exactly what you wanted in terms of stone type, quantity, size, colour, and quality – meaning that you need to check if the tiles have any defects. It is also a good idea to mix the tiles from different boxes, prior to tiling. Thus you will ensure to have all shade variations around the entire surface you are covering. During tiling one of the most important things to remember is to immediately clean the tile surface of any wax, grout or adhesive materials. The final and quite essential step in the process is to properly clean and seal your natural stone tiles, so that you can enjoy them for a longer period of time. Follow strictly the instruction on the sealer that you are using and remember that different stone types require different sealers.
Now, with this initial essential piece of advice in your mind, you can start the actual laying of your natural stone tiles, following this step-by-step guidance for laying bathroom and floor tiles.
How to lay bathroom tiles?
Installing natural stone tiles in your bathroom will provide unique atmosphere that would make you feel pampered as if in a spa center. The cost of natural stone tiles versus ceramic tiles is a bit higher but the expense is worth it in terms of aesthetic beauty and durability. The overall process of laying natural stone tiles is not much different than that of regular tiles but nevertheless has some peculiarities. The time you will need to redecorate your bathroom depends on its size but we consider it a project of moderate complexity, most of which can be finished within a weekend.
Make sure to have all your tools and materials ready before you start tiling as this will save you time and visits to the store. It's a good idea to have a checklist of all you need and just follow it. For a bathroom tiling project you need to have the following tools handy:
Level
Grout float
Notched and margin trowels
Drill tiling sponge
Utility and taping knife
Pencil
Tile spacers
Cement board screws
Tile cutting instruments depending on your natural stone type – diamond blade wet saw, carbide grit hole saw and jigsaw blade
Make sure to have all the necessary materials ready as well:
Natural stone tiles
Tile backer board – usually cement board
A waterproof membrane or alkali-resistant mesh
Grout
Thin-set mortar
Caulк
Tile sealer
Once your inventory is ready, you can start tiling following these simple steps. The process will be the same regardless of whether you have a tub or a shower in your bathroom.
[powr-image-slider id=c70b93b3_1479900460]
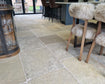
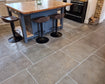
1.Choose your natural stone and decide on a design
Some may see this as the most complex part of the project, since there is a great variety of natural stone tiles that are suitable for bathrooms – marble, granite, limestone, travertine – and an even greater variety of colours and shades and hence matching possibilities. You can find some ideas in our showroom and we will always gladly assist you in making your choice. A combination of polished and unpolished tiles is a good idea, as is the mixing of marble and limestone or travertine, for example. Make sure, however, that you combine tiles of the same thickness and that the same type of grout can be applied to them.Prepare your bathroom
2. Prepare Your Bahtroom
Make sure that your bathroom walls are properly prepared for the new natural stone tiles. First, of course, you need to remove all old tiles. To do that, make sure that you have cleared the bathroom of all belongings and if you have a tub that it is properly covered with a cloth or even better plywood and tape the rims to avoid scratching or breaking it. Clear immediately any debris that ends up in the tub. Once the old tiles are removed, check if the backer board is left intact. Usually, it is damaged and is better to replace it with a new one. It is good to choose cement board as it will withstand wet longer and is therefore more suitable for bathrooms, especially with a shower. You need to measure your walls and cut the board accordingly. Make sure to make all the necessary holes and cutouts as well. You can cut with knife but the blades will dull quickly and you need to replace them often so better opt for a special carbide scoring tool. You can also make the hole cutouts by a carbide-grit jigsaw. Use the cement board screws to attach the tile backer to the wall. Cover the joints with a special alkali-resistant mesh tape and thin-set mortar. You can also apply a water-proof membrane to the board to make it more water resistant, especially if you are using a shower and not a tub.
3.Get ready for the layout
It is a good idea to mark the layout of your tiles prior to installing them on the wall. You can have a dry run on the floor, which will allow you to choose the pattern and also decide where to make cuts. Make sure to use tile spacers, so that it is as realistic as possible. Mark the layout on the wall and begin from the second row up from the tub rim or shower bottom, because they are usually not straight and you will have to cut the tiles. Draw a horizontal line at this level and then follow through with the other vertical or horizontal lines that you deem necessary for your layout. Make sure that you have measured correctly the length of the wall and that you start from the middle with a whole tile and end up in the corners with two halves.
4.Apply thin-set mortar and install the tiles
Here comes the actual tile installation phase of the project. First you have to mix the thin-set mortar. Always follow the instructions of the manufacturer and prepare thin-set that will last for about 30 minutes of work. It is better to use white mortar for natural stones of light colours to avoid darkening of the tile. When the mixture is ready apply it on the wall using the flat side of the tile trowel and then use the notched side to "comb" the thin-set – thus tiles hold better. Apply only as much thin-set on the wall as you will be able to cover in 15 minutes. If it has already dried on the wall just scrape it off and spread some fresh one. Don't forget to place tile spacers to form a straight grout line and to keep the tiles in place – thin-set mortar needs some time to hold better.
5.Cut the tiles
When the easier part of the job is done with installing the whole tiles, comes the time to make cuts. You need the appropriate tools and a good cutting technique to achieve the desired results. But most important is that you protect yourself properly prior to cutting. Use safety mask and goggles to avoid the tiny particles getting into your mouth and eyes, and use gloves to protect your hands. Before cutting, you can use a pencil to mark where the tile has to be cut. Use a tile cutter or a wet saw (diamond blade is better) to cut the tiles. Push the tiles slowly through the wet saw to avoid breaking or splitting it. To make the holes for the faucets, for example, use carbide-grit hole saw and apply light pressure. As this is one of the trickiest steps of the tile laying process, consider having a professional cut your tiles or check if the shop that sells the natural stone tiles doesn't offer such a service.
6.Grout tile joints
Once you have laid the tiles on the wall, you should let them settle for at least a day before grouting. Make sure to remove all tile spacers and clean the surface of the tiles from any mortar. Mix the grout according to instructions until it has the consistency of peanut butter but don't prepare the whole container at once. Use a grout float to apply the mixture to the joints by a sweeping motion. Remove any excess grout using the same technique. Make sure the grout lines are filled before you move to the next section. Every 10-15 minutes stop and clean the tiles with a damp tiling sponge extra carefully to avoid removing the grout from its place. Once the grout has settled completely – after about an hour – you can use the sponge to clean any excess grout and then polish the tiles with a dry towel. If you have chosen marble tiles for your bathroom decoration you can coat them with grout remover or tile sealer prior to applying the grout to avoid stains.
7.Seal the grout and caulk the corners
You are almost ready with your bathroom project. There are just few last steps left. Once the grout has dried completely – usually takes 3 to 7 days and is written in the instructions of the sealing product – you can seal it. This will protect the grout from stains and moisture. Then you can also fill all the corners with a special caulk for tubs and tiles. Choose a caulk colour that matches your grout for a better look. The final step will be to install the faucets, the tub and shower spouts or any towel bars or soap dishes.
Congratulations, your new bathroom is ready and you can enjoy the beauty of your natural stone tiles while taking a shower or having a bath.
How to lay floor tiles?
Choosing natural stone tiles for your floor is a decision that is worth the investment. They will change the entire atmosphere of the room, no matter if it is a hallway or a kitchen. Natural stone is also much more durable and easier to maintain than ceramic flooring. Before you start installing the tiles it is a good idea to prepare a list of all the necessary materials and tools and have them prepared to facilitate the process. The tools you will need are:
Hammer gun
Wet saw
Floor scraper
Margin trowel
Grout float
Grouting sponge
Protective clothing – mask, goggles, gloves
Plastic bags
Buckets
Heavy duty vacuum cleaner
The materials for your new floor are:
Natural stone tiles – marble, limestone, granite, travertine, slate
Grout
Quick-setting thin-set
Sealer
Once you have all the necessary tools and materials handy, the installation of the new flooring is a fairly simple job, especially if you follow these steps:
[powr-image-slider id=0f3af025_1479981412]
1.Remove the old flooring
You start with removing the old tiles from your floor by using a hammer gun with a chisel bit. The professionals advise to place the tip of the hammer gun along the grooves of the tile joints as thus you will crack tiles easier. It is also better to apply pressure on the outside edges of the tiles. It is also recommended to remove the old thin-set so that you can end up with a smooth floor to lie the tiles on. You need to place the hammer drill along the thin-set line to remove it easier.
2.Clean the area
Once you have removed the old tiling and thin-set you need to clean the area very well before proceeding further. Use industrial strength plastic trash bags for the broken tiles and other bigger pieces. A heavy duty vacuum cleaner is what you need to get rid of all the dust and tiny particles left after the hummer gun. Make sure that you have a clean and even surface before you proceed with the actual installation.
3.Get ready for the installation
Prior to laying the tiles on the floor it is a good idea to run a dry test of how the area will look like. Start by measuring the floor to determine how many full tiles you will accommodate and how many will have to be cut. Choose where the cut tiles will go – usually in the corners, along the wall or steps, if any. You can lay the tiles on a certain area of the floor to create a pattern or even make a drawing that you can follow in case you are using two different colours.
4.Apply the thin-set
In order to mix the thin-set you need an empty bucket and a paddle mixer. Follow the instruction by the manufacturer in terms of proportions of thin-set/water. Mix it until it has the consistency of pancake batter. Let it rest for about 5 minutes and then mix it again. Use the smooth end of the trowel to apply the thin-set on the floor. You can level the surface and set any irregularities straight by using the appropriate amount. Once you lay the thin-set use the notched side of the trowel to "comb" it, so that tiles can stick better. Work on a small sections at a time, so that the thin-set doesn't dry.
5.Set the full tiles
Start with the whole tiles first. It is a good idea to set the first tile in a corner and work on from there. When laying natural stone tiles it is better to leave small joints as this will emphasize the beauty of the stone. Use a toothpick to space the tiles easier. Don't forget to follow the pattern you have chosen for your flooring. Clean immediately any amount of thin-set from the surface of the tiles with a wet sponge. Allow the tiles to dry.
6.Cut the tiles
There will be several tiles that need to be cut in order to fit the areas along the edges or to match the pattern you have chosen. Make sure to measure and mark each tile individually and to double check it before proceeding with the cut. A wet saw is the most efficient tool when cutting tiles. Make sure that you are using the correct blade depending on the type of natural stone you are cutting. For limestone a masonry blade will work well, while for granite, which is harder, a diamond blade will be better. Once a tile is cut you can check first whether it fits in its place and make corrections if necessary before setting it with thin-set. Be extra careful while cutting natural stone and use protective clothing, mask, goggles and gloves.
7.Set the cut tiles
Once the tiles are cut as needed, proceed with laying them. You can apply the thin-set either on the floor using the same technique as with full tiles, or on the tile directly if you need to be more precise. Don't forget to clean the surface of the tiles of any excess thin-set before it dries, using a wet sponge.
8.Apply the sealer
Natural stone tiles need to be sealed because the stone sealer protects them from staining and wearing off. So, once the tiles have dried completely, you need to clean them with water and wipe them dry. Now they are ready for the sealer. Choose a sealer according to the type of natural stone and follow the instructions. Some sealers are sprayed, while others applied with a brush similar to paint. Let the sealer dry before proceeding further.
9.Grout the tiles
To finish the flooring you need to apply grout. Choose a colour that compliments your natural stone and follow the instructions on how to mix it. Use a rubber float to spread the grout along the joints and make sure that they are well filled. Make sure to grout the cut tiles to the wall. Work on small areas and clean the grouted tiles with a wet sponge, using clean water, once you complete the area. Let the grout dry fully and clean the entire floor once again using a wet towel or sponge. Now you can enjoy your natural stone flooring.
If you maintain the natural stone properly it will serve you for a long period of time, no matter if you have chosen marble for your kitchen, granite for your bathroom or limestone for your hallway flooring. You can find some tips on how to clean your natural stone tiles here.